Overview
Automation is at the heart of most things we do at LinkORB. In keeping with our automation policy, we host pre-configured Docker images on GitHub container registry to ensure team members focus on building (instead of configuring) projects. Containerizing shared projects with the team also offers:
- faster testing, review, and deployment
- platform independence
- minimal configuration
This document explains how to containerize and develop a Symfony application using LinkORB’s PHP Docker image.
Prerequisites
While not a hard prerequisite, if containerization and Docker are new concepts, please consider reading How to containerize a PHP application using Docker and LinkORB libraries. It provides greater detail on some of the concepts referenced in this guide.
Assumptions
This guide assumes you will run Windows-specific terminal commands using the Command Prompt. Such commands may not work if run in Git BASH for Windows. If your integrated development environment (IDE), such as VSCode, uses Git BASH as its integrated terminal, please set Command Prompt as the IDE’s integrated terminal or run Windows-specific commands in a terminal outside the IDE.
Specifically, this guide discusses how to:
Fork LinkORB’s PHP Docker image repository
If you do not currently have access to the PHP image repository, please do the following:
- Request read access to the PHP Docker image repository from the appropriate team member.
- Accept the GitHub invitation to become a contributor to the repository if your request is approved.
- Create a fork of the repository.
Having forked the PHP image repository, you should have read and write permissions to files and packages (including container images) in your fork.
Create and configure a personal access token
A Personal Access Token (PAT) gives you granular access to resources in your GitHub account without using your password. It’s a great solution for granting third party tools such as Docker read-only access to private container images in your and your organisation’s repositories. Docker needs this access to download the required PHP image from the ghcr.io namespace of the container registry.
ghcr.io is a Docker container registry namespace that GitHub uses to store an account’s or organisation’s container images. For example, you can pull LinkORB’s Docker images from GitHub’s container registry by running docker pull ghcr.io/linkorb/<repository-name>:<image-tag>
Step 1: Configure a credentials store
Before creating a PAT and using it to authenticate to the container registry, please configure a secure credential manager to prevent unauthorised access to the PAT. In the absence of a secure credential manager, Docker saves access tokens as Base64-encoded text in the ~/.docker/config.json file, which can be easily compromised. Please configure a credentials store as described below.
The Docker team provides different credential helpers for the following operating systems:
- Windows: wincred
- Linux: pass or secret service
- macOS: osxkeychain or pass
Configure a Credentials store using Docker credential helpers as follows:
Windows
Docker Desktop automatically installs docker-credential-wincred.exe in C:\Program Files\Docker\Docker\resources\bin. wincred uses Windows Credential Manager.
Ensure docker-credential-wincred.exe is correctly installed as follows before you continue.
Open a terminal and run the following command to ensure the wincred helper is installed.
docker-credential-wincredThe above command should return the following message.
Usage: docker-credential-wincred <store|get|erase|list|version>Please update to the latest version of Docker Desktop if running docker-credential-wincred returns the following error message.
'docker-credential-wincred' is not recognised as an internal or external command, operable program or batch file.Linux
Configure pass (with gpg) as your Docker credentials store using docker-credential-pass helper as follows:
- Visit Docker credential helpers releases page and download the
docker-credential-pass-v<version>.linux.<architecture>file for your computer’s architecture (armfor MacBooks running Linux andamd64for other PCs). - Open a terminal and navigate to the folder containing the downloaded credential helper.
- Run the following command to make the helper an executable file.
chmod a+x docker-credential-pass* - Move the credential helper to a folder that is already in the system’s
PATHenvironment variable.sudo mv ~/Downloads/docker-credential-pass* /usr/local/bin/docker-credential-pass - Download and install pass and gpg for your distribution. E.g. for Debian/Debian-based distributions, run the following command:
sudo apt update && sudo apt install pass gpg - Generate a
gpgkey with the following command and enter your name and email when prompted.gpg --generate-key - Press O (Upper case letter O), then press Enter.
- Enter and confirm an 8-character or longer password for the key and press Enter. This will generate a
gpgkey similar to the one shown in the image below.
- Copy the generated
gpgpublic key (labeled pub) to the clipboard. - Run the following command, replacing
<gpg-public-key>with thegpgpublic key you copied in the previous step and press Enter.pass init <gpg-public-key> - Edit the ~/.docker/config.json to add
"credsStore": "pass"as its top-level property so that the JSON object in the file looks similar to the following:{ "credsStore": "pass" }
macOS
Open a terminal and run the following command to install docker-credential-osxkeychain through Homebrew.
brew install docker-credential-helperStep 2: Create a GitHub personal access token
- Create a personal access token on GitHub as described here.
- Select only the read
checkbox in the Select scopes section when creating the token. - Copy the generated access token.
Step 3: Authenticate to the container registry
Run the following command in the terminal:
- Copy and paste the following command into the terminal, replace
<your-github-username>with your actual GitHub username, then press Enter.
docker login ghcr.io -u <your-github-username>- Right click the cursor next to the Password: prompt and select paste if you’re on Linux or macOS. If you’re on Windows, simply right click the cursor next to the Password: prompt to paste the PAT.
- Press Enter.
Congratulations! You’ve just configured a secure credentials store, generated a GitHub access token, and logged into GitHub’s container registry with that token. Docker will now store the authentication token in a secure credential manager and use it for subsequent operations that require access to packages (including containers) in your GitHub repositories.
Create a Symfony application using Docker
As a goal of this guide is to demonstrate the use of a shared image, we will now instruct Docker to create a new Symfony application using the ghcr.io-hosted LinkORB PHP image:
-
Open a terminal on your local machine and navigate to the location you wish to store the application.
-
Run the following command, replacing
my-symfony-appwith the name of your application to create a Symfony application and install its dependencies.If you’re running these commands on Linux, your credential manager may ask you to enter the
gpgkey’s password created in an earlier section of this guide.Linux and macOS:
docker run --init -it --rm \ -u "`id -u`:`id -g`" \ -v "$(pwd):/app" \ -w /app \ ghcr.io/linkorb/php-docker-base:php8 \ composer create-project --no-cache symfony/skeleton my-symfony-app && \ cd my-symfony-app && \ docker run --init -it --rm -u "`id -u`:`id -g`" -v "$(pwd):/app" \ -w /app \ ghcr.io/linkorb/php-docker-base:php8 composer require --no-cache --no-interaction webappWindows:
docker run --init -it --rm ^
   -v "%cd%:/app" ^
   -w /app ^
   ghcr.io/linkorb/php-docker-base:php8 ^
   composer create-project --no-cache symfony/skeleton my-symfony-app && ^
   cd my-symfony-app && ^
   docker run --init -it --rm ^
   -v "%cd%:/app" ^
   -w /app ^
   ghcr.io/linkorb/php-docker-base:php8 composer require --no-cache --no-interaction webapp
The command above instructs the system to do the following:
- Run the
php8variant of LinkORB’s Docker image, - Bind the current working directory on your computer to the app folder of the container created by the image.
- Use the Composer binary installed inside the container to create a new web application project named
my-symfony-app(i.e.composer create-project --no-cache symfony/skeleton:6.2.* my-symfony-app) inside the container. - Save the created project to the current working directory of your computer.
- Navigate to the root of the newly created project directory (
cd my-symfony-app). - Use the Composer binary installed inside the container to install the Symfony project’s web application dependencies.
- Save the installed dependencies to your (host) computer.
You now have a working local Symfony application that you can develop and or play with. Go ahead and make changes to it. You can run the application locally if you want. However the next goal of this guide is to explain how to containerize the new Symfony application so it can be easily shared, consistently re-built, and used by other members of the team.
- Run the
Containerize the Symfony application
In the previous section, we instructed Docker to create our new Symfony application. Now we will build the Symfony container image using a Dockerfile which specifies what kind of image Docker will build. With this Dockerfile, the Docker engine can rebuild our application in the same way, every time, for every team member. A properly constructed Dockerfile abstracts all project dependencies and ensures a consistent (and quick) development environment setup for all team members.
Step 1: Create a Dockerfile
Create a new file inside the project folder and name it Dockerfile as shown in the image below.
   ```
   @startsalt
   {
      {T
      + my-symfony-app/
      ++ Dockerfile
      }
   }
   @endsalt
   ```
Step 2: Use LinkORB’s PHP image as the base container image
Add the following line to the Dockerfile to base your Symfony application image on LinkORB’s PHP 8 image.
FROM ghcr.io/linkorb/php-docker-base:php8Step 3: Add quality assurance tools to the image
Add PHP-based QA and testing tools such as phpunit to the container image by copying the following code into the Dockerfile.
COPY --chown=www-data:www-data --from=jakzal/phpqa /tools /tools

ENV PATH="$PATH:/tools:/tools/.composer/vendor/bin"
phpqa is a docker image used for quality assurance and static code analysis. The ENV command above updates the container image’s PATH environment variable to make the QA tools globally accessible in the container.
Step 4: Install additional PHP extensions
OPCache is a caching plugin that improves a PHP application’s performance. If required, you may add it to the Dockerfile with the following commands. The COPY command installs dependencies that allow the installation of PHP extensions while the RUN command installs OPCache and makes www-data the owner of the /tools folder.
COPY --from=mlocati/php-extension-installer /usr/bin/install-php-extensions /usr/bin/

RUN install-php-extensions opcache
Step 5: Run commands as a non-root container/image user
LinkORB’s PHP image has an existing non-root system user account and group named www-data. Run subsequent commands that do not require root privileges as the www-data user by adding the following line to the Dockerfile.
USER www-data:www-dataAll commands from this point forward will execute with non-root privileges.
Step 6: Install QA plugins
To add new tools to the existing QA tools in the /tools folder, run the composer global bin command as shown in the following example which installs some PHPStan plugins.
ARG COMPOSER_HOME=/tools/.composer

RUN cd /tools/.composer && \
   composer global bin phpstan require \
   phpstan/phpstan-phpunit \
   phpstan/phpstan-doctrine \
   phpstan/phpstan-symfony
Note that the COMPOSER_HOME argument above is only available as an environment variable at build time. Its value will reset to the image’s default value at container runtime.
The Dockerfile
At this point, the Dockerfile’s contents should look like the following code block.
FROM ghcr.io/linkorb/php-docker-base:php8

COPY --chown=www-data:www-data --from=jakzal/phpqa /tools /tools

ENV PATH="$PATH:/tools:/tools/.composer/vendor/bin"

COPY --from=mlocati/php-extension-installer /usr/bin/install-php-extensions /usr/bin/

RUN install-php-extensions opcache

USER www-data:www-data

ARG COMPOSER_HOME=/tools/.composer

RUN cd /tools/.composer && \
   composer global bin phpstan require \
   phpstan/phpstan-phpunit \
   phpstan/phpstan-doctrine \
   phpstan/phpstan-symfony
Build the Symfony container image
Build a runnable image from the Dockerfile as follows:
-
Open a terminal and navigate to the location of the Dockerfile you created earlier.
-
Copy the following command into the terminal and press Enter.
docker build --pull -t my-symfony-app .If you get the following error message, please authenticate to the container registry.
ERROR: failed to solve: failed to fetch oauth token: unexpected status: 403 Forbidden
Run the containerized Symfony application
-
Copy the following command into the terminal and press Enter to run the Symfony application in a container.
Linux and macOS
docker run -it --rm -p 8000:80 -v "$(pwd)":/app my-symfony-appWindows
docker run -it --rm -p 8000:80 -v "%cd%":/app my-symfony-appYou don’t have to bind port 8000 of the host (your computer) to port 80 of the container as shown in the above example. You may bind the container’s port to whichever unprivileged host port you prefer and the host will forward all TCP requests for that port to the containerized app. Apache listens for connections on port 80 by default and the LinkORB PHP image already exposes port 80. It is unlikely you’ll need to modify this value.
Changes to local files mounted into a container persist even after you stop the container. This allows you to commit such changes to version control.
-
Now, make changes to the local project files and verify that the changes have taken effect in the browser by visiting or refreshing http://localhost<8000>.
Run binaries inside the Symfony container
You can run PHP, Composer, and other binaries in a devcontainer’s terminal the same way you will run such commands on your local computer’s terminal.
To execute binaries inside the container (against both mounted local and containerized files) when working outside a devcontainer, you need to pass the command you wish to execute as the last argument of a docker run command. For example, the following command uses PHPStan to check for bugs in PHP scripts stored in the src folder.
Linux and macOS:
docker run -it --rm -v "$(pwd):/app" my-symfony-app phpstan analyze --level=0 srcWindows:
docker run -it --rm -v "%cd%:/app" my-symfony-app phpstan analyze --level=0 srcNote that the above commands mount the local files into the container to run PHPStan against the latest changes.
Develop the containerized Symfony application within a devcontainer
A development container (devcontainer) is an interactive virtual development environment specifically configured to work with the tools in a given Docker container. For example, you may develop the demo Symfony application in this guide within a VSCode devcontainer as follows:
Step 1: Create a non-root user with shell access
Although the LinkORB PHP image has an existing www-data user, this user is a system account that has several restrictions which are not ideal for dev container use. For example, the www-data user cannot access an interactive shell and some files in the container.
Replace the content of the Dockerfile created earlier with the following code to add and configure a normal user.
FROM ghcr.io/linkorb/php-docker-base:php8

RUN groupadd devuser && \
    useradd -mg devuser devuser && \
    chsh -s /bin/bash devuser && \
    chown -hR devuser:devuser /app && \
    sed -i 's/Listen 80/Listen 8000/g' /etc/apache2/ports.conf && \
    sed -i "s/*:80>/*:8000>/g" /etc/apache2/sites-enabled/000-default.conf

EXPOSE 8000

COPY --chown=devuser:devuser --from=jakzal/phpqa /tools /tools

ENV PATH="$PATH:/tools:/tools/.composer/vendor/bin"

COPY --from=mlocati/php-extension-installer /usr/bin/install-php-extensions /usr/bin/

RUN install-php-extensions opcache

USER devuser:devuser

ARG COMPOSER_HOME=/tools/.composer

RUN cd /tools/.composer && \
    composer global bin phpstan require \
    phpstan/phpstan-phpunit \
    phpstan/phpstan-doctrine \
    phpstan/phpstan-symfony
The above code introduces the following changes:
- Creates a user and group named
devuser. - Sets BASH as
devuser’s default shell. - Makes
devuserthe owner of the container’s /app and /tools folders. - Sets
devuseras the container’s user. - Configures Apache server to listen for connections on port 8000.
- Exposes port 8000 in the container.
Step 2: Configure the devcontainer
-
Create a new directory named .devcontainer at the root of the project. Note that the directory’s name starts with a period.
-
Create a devcontainer.json file inside the .devcontainer directory as shown in the image below.
``` @startsalt { {T + my-symfony-app/ ++ ... ++ .devcontainer +++ devcontainer.json ++ ... } } @endsalt ``` -
Copy the following code into the devcontainer.json file and save it.
{
   "name": "my-symfony-app",
   "dockerFile": "../Dockerfile",
   "workspaceMount": "type=bind,src=${localWorkspaceFolder},dst=/app",
   "workspaceFolder": "/app",
   "forwardPorts": [
      8000
   ],
   "postCreateCommand": "composer install --no-cache --no-interaction",
   "postStartCommand": "apache2-foreground",
   "customizations": {
      "vscode": {
         "extensions": [
            "whatwedo.twig"
         ]
      }
   },
   "remoteUser": "devuser",
   "shutdownAction": "stopContainer"
}
The above instructs the development container to:
- build a virtual workspace using the Dockerfile
- bind-mount the current working directory of the host to the devcontainer’s /app folder
- forward requests made to port 8000 of the host to port 8000 of the devcontainer
- install the application’s dependencies (only once) after creating the devcontainer
- run Apache server each time the devcontainer starts
- install Twig extension in the virtual workspace when running in VSCode or in a Codespace
- stop the devcontainer when the Codespace stops
Please see Create a dev container for more information.
-
Install the Dev Containers extension in VSCode.
-
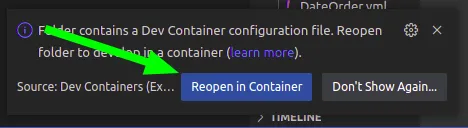
Click Reopen in container on the popup message at the bottom right of the screen or click the green button at the bottom left of VSCode’s window and select Reopen in container. Restart VSCode if Reopen in container does not appear on the screen.
-
Click Starting dev container (show log) at the bottom right of the screen to see the container creation/startup log and wait for the build to complete.

-
Click the globe icon in the Local Address field of the Ports tab in VSCode’s integrated terminal to open the containerized application in a browser.
Develop the containerized Symfony application within a GitHub Codespace
Continue to develop the Symfony application using a GitHub Codespace as follows:
-
Commit .devcontainer/devcontainer.json and other project files to version control, and push the changes to GitHub.
-
Log into your GitHub account using a web browser.
-
Create the following Codespace secrets and give the repository access as described in adding a secret:
GHCR_CONTAINER_REGISTRY_SERVER=ghcr.ioGHCR_CONTAINER_REGISTRY_USER={ your GitHub username }GHCR_CONTAINER_REGISTRY_PASSWORD={ GitHub personal access token with only "read:packages" access }
See creating a personal access token (classic) for more information on creating GitHub tokens.
-
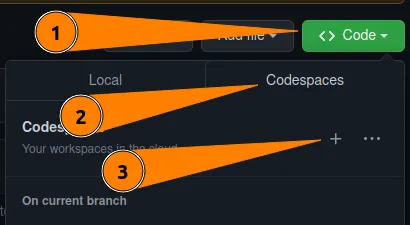
Go to Code > Codespaces on the repository and click the + icon to create a new Codespace.
-
When the Codespace starts, wait until the terminal shows it’s running the
postStartCommand, then click the globe icon in the Local Address field of the Ports tab in the integrated terminal to view the containerized application in a browser tab.
You can make changes to the application’s code, test it, and do other tasks you’d normally do in your IDE right in the Codespace and push the code to your GitHub repository.
Share the containerized Symfony application with the team
To share the application with the team, commit the changes and push the code and assets to GitHub. Update the application’s README.md file with instructions for how to build, run, and develop the application.
A few points to note in the README.md file include:
-
Contributors need to run the following command to install the application’s dependencies when working outside a devcontainer.
Linux and macOS
docker run --init -it --rm -u "`id -u`:`id -g`" -v "$(pwd):/app" \
   -w /app \
   composer install --no-cache --no-interaction
Windows
docker run --init -it --rm -u "`id -u`:`id -g`" -v "%cd%:/app" ^ -w /app ^ composer install --no-cache --no-interaction -
To run their forks of the repository in a Codespace, contributors need to add Codespace secrets listed in Develop the containerized Symfony application within a GitHub Codespace to their forks.
Next steps
Please see How to connect a containerized Symfony application to a database container if the application requires a database. Checkout Containerisation best practices for more information on optimising/securing container images.