What is containerisation?
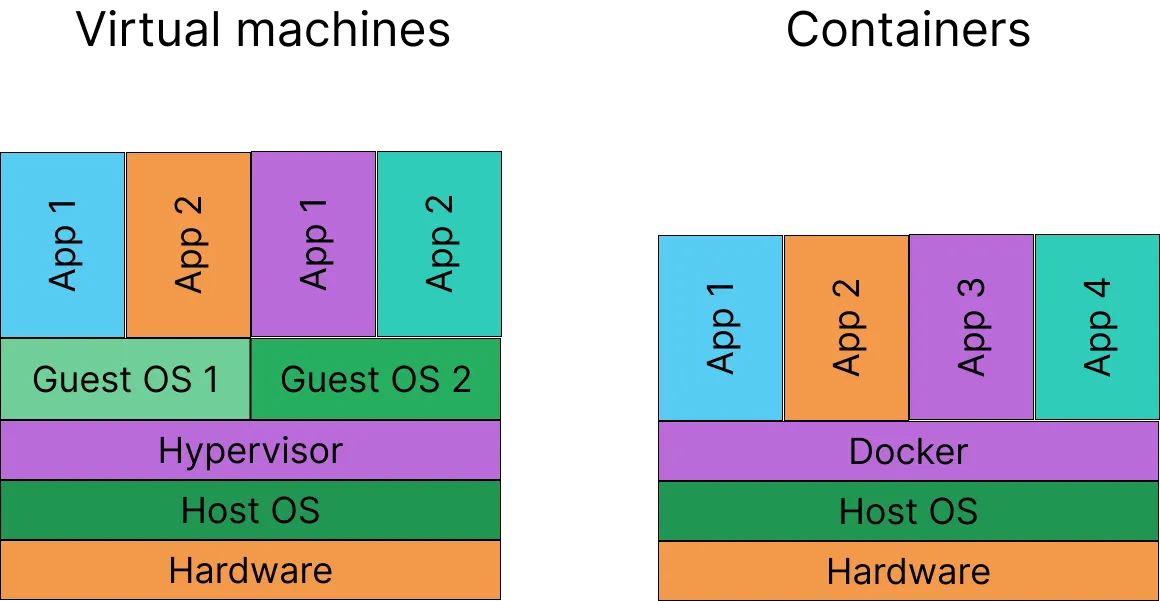
Containerization is a lightweight application virtualization solution. It allows development teams to build and run applications as fully portable, self-contained, and sandboxed processes on a single host. Unlike traditional virtual machines which are resource-heavy, containers are lightweight because they leverage the host operating system’s resources.
Containers have automation, development, security, and scalability advantages. In software development, for example, containerization treats a project as a portable computing environment that team members (frontend, backend, and database developers) can run on any operating system without doing complicated setup. The primary components of a container are:
- A trimmed-down system image
- A single application or service for the container to run
Purpose
This guide outlines how to containerize a PHP application that uses LinkORB’s php-tools library. php-tools is an open source library which installs commonly used PHP tools as global executables to reduce complexity in project constraints and dependency management.
Specifically this document will address:
Build a PHP application image
A Docker image is a lightweight, isolated filesystem. It comprises dependencies, system packages, application files, and configuration that a container uses to run an application as shown in the diagram below.
```
@startsalt
{
   {T
      + PHP application image
      ++ File system
      +++ System packages
      +++ User installed packages
      +++ PHP application
      ++++ Dependencies
   }
}
@endsalt
```
The easiest way to build a PHP application image is to use a Dockerfile, but first you need to add php-tools to your project as described below.
Step 1: Add php-tools to your project
- Open the project in VSCode and press Ctrl+` to open the integrated terminal.
- Clone php-tools from GitHub by running the following command in the terminal.
git clone https://github.com/linkorb/php-tools.gitAfter git clones the library, you will notice it has added a php-tools folder to the root of your project.
```
@startsalt
{
   {T
      + Project
      ++ ...
      ++ php-tools/
      ++ ...
   }
}
@endsalt
```
Step 2: Create a Dockerfile
A Dockerfile is a script that Docker uses to build images. Create a Dockerfile file in the root directory of the project. Ensure it’s on the same level as the php-tools folder.
```
@startsalt
{
   {T
      + Project
      ++ ...
      ++ Dockerfile
      ++ php-tools/
      ++ ...
   }
}
@endsalt
```
Step 3: Build on top of an existing image
Consider what tools you need to host a PHP application. The tools you choose will depend on the nature of your project, but assume for the purpose of this guide that your application only needs PHP, Apache web server, and Composer dependency manager.
Although it’s possible to take a Linux-based Docker image and install PHP, Apache, and Composer on it by yourself, a better approach is to use Docker’s official PHP image as the starting point for building your application’s image. The apache variant of the official PHP image comes with the current stable version of PHP and Apache already installed. Add the following code to the Dockerfile to leverage the latest PHP and Apache image.
FROM php:apacheStep 4: Expose a network port
Add the following command to the Dockerfile to allow TCP connections on port 80 of the containerized app.
EXPOSE 80Step 5: Set the image’s/container’s working directory
The PHP Apache image expects to find the application’s files in its /var/www/html folder. Add the following configuration to the Dockerfile. It tells Docker to set /var/www/html as the image’s working directory at build time and at container runtime.
WORKDIR /var/www/html/Step 6: Install Composer
The php-tools library uses Composer for dependency management. Take advantage of Docker’s multi-stage builds by instructing it to copy the composer file in the official Composer image to your application’s image. To copy Composer into the PHP application’s image, add the following command to the Dockerfile.
COPY --from=composer:lts /usr/bin/composer /usr/bin/composerCOPY <source> <destination> copies files from a source into a destination in the current image. The --from=composer:lts option tells Docker to copy data from the latest stable version of Composer on Docker Hub.
Step 7: Update and install programs in the application’s image
You have added PHP, Apache, and Composer to the image. However, Composer requires Git to download packages from source. It also requires unzip and p7zip-full to decompress downloaded package archives. Because the PHP Apache image is based on Debian, you can install these packages using apt. Add the following lines to the Dockerfile to install these three packages and configure Apache server.
RUN apt update && \
   apt install --no-install-recommends -y \
   git unzip p7zip-full && \
   echo "ServerName localhost" >> /etc/apache2/apache2.conf
RUN tells Docker to execute a command in the image’s shell.
--no-install-recommends prevents the installation of non-essential dependencies such as additional documentation.
apt install requires the -y flag because Docker does not build images in an interactive shell.
Using --no-install-recommends, and chaining apt update with apt install are important for minimising the size of an image. See Containerisation best practices for more information.
Docker uses the Unix Shell (sh) by default. If you need to run commands specific to a different shell such as BASH, invoke that shell with the -c option. E.g. bash -c "source ~/.bashrc".
Step 8: Run commands as a non-root user
Linux based Docker images like the PHP Apache image have clear cut root and non-root privileges. Although most images run as the root user by default, they often have an existing non-root system user account. In the case of the PHP Apache image used in this guide, the existing non-root user and user group is www-data and the home directory of this user is /var/www/html.
To maintain good operational security while building and running PHP images, run commands such as composer install which do not require root privileges as a regular user.
Add the following line to the Dockerfile to switch to a non-root user account and group. See Dockerfile USER for more information.
USER www-data:www-dataAlternatively, use the RUN command to invoke useradd and groupadd to create the user account and group if they don’t already exist.
Step 9: Copy project files into the image
Add the following line to the Dockerfile. It copies the project’s files into the Docker image’s working directory (i.e. /var/www/html) and sets www-data as the owner and group of the copied files.
COPY --chown=www-data:www-data . .Docker creates an intermediate container every time it encounters RUN, ADD, or COPY in a Dockerfile. See Containerisation best practices for more information.
Step 10: Add php-tools’ binaries to the container’s path
The ENV command in a Dockerfile sets an environment variable in a container. To make php-tools globally available, add the /path/to/php-tools/bin folder to the container’s PATH as shown below.
ENV PATH="/var/www/html/php-tools/bin:$PATH"Step 11: Install php-tools
Copy the code block below into the Dockerfile to install php-tools’s packages.
RUN cd php-tools && \
   composer install --no-cache
The reason for invoking another RUN command in this build is to avoid running Composer as root since the previous RUN command runs as root before the change in step 8.
Complete Dockerfile contents
Your Dockerfile’s contents should look like the following by now.
# Build from the base image that has PHP and Apache already installed
FROM php:apache

# Set working directory
WORKDIR /var/www/html/

# Copy Composer from Composer Docker image to current image
COPY --from=composer:lts /usr/bin/composer /usr/bin/composer

# Update system package repositories
# Install git, pzip-full, and unzip Debian packages
# Configure Apache ServerName in image
RUN apt update && \
   apt install --no-install-recommends -y \
	git p7zip-full unzip && \
   echo "ServerName localhost" >> /etc/apache2/apache2.conf

# Run subsequent commands as www-data user account and group
USER www-data:www-data

# Copy project files into the image and make www-data the files' owner/group
COPY --chown=www-data:www-data . .

# Add php-tools' bin folder to the image's PATH
ENV PATH="/var/www/html/php-tools/bin:$PATH"

# Composer's default timeout is 300 seconds. If it times out, uncomment the next line and rebuild the image.
# ENV COMPOSER_PROCESS_TIMEOUT=600

# Make www-data the group and owner of copied project files
# Navigate to php-tools folder
# Install php-tools' packages without caching downloaded packages
RUN chown -hR www-data:www-data /var/www/html/ && \
	cd php-tools && \
	composer install --no-cache
Step 12: Selectively copy files into the image
Docker uses a .dockerignore file to define which files should not be copied into the image. The .dockerignore file is a great solution for keeping secrets (e.g. .env and the vendor/ folder) out of a container. Ignore such files in a project as follows:
- Create a .dockerignore file at the root of your project. Ensure it’s on the same folder level with the Dockerfile as shown below.
```
@startsalt
{
   {T
      + Project
      ++ ...
      ++ Dockerfile
      ++ .dockerignore
      ++ ...
   }
}
@endsalt
```
- Add the paths in the following code block to the .dockerignore file to ignore them when Docker copies the project into the image.
vendor
.env
See Manage sensitive data with Docker secrets for managing secrets in a local environment. To manage secrets in remote environments, see Managing encrypted secrets for your repository and organization for GitHub Codespaces.
Step 13: Build the image
- Save the Dockerfile.
- Press Ctrl+` to open VSCode’s integrated terminal.
- Build the image by running
docker build -t <image name> .in the terminal. Replace<image name>with the application’s name. For example
docker build -t php-tools-demo .The docker build command builds a runnable Docker image. The -t flag tags the image as php-tools-demo and the period (.) instructs Docker to use the Dockerfile in the current directory for the build.
Run the containerized PHP application
A container is a runnable instance of an application image. Type the following command into the terminal and press Enter to run the image.
docker run -it -p 8000:80 --rm php-tools-demoThe -it flag is actually -i and -t. Taken together, -it tells Docker to run the image in interactive mode with a pseudo tty. -p binds port 8000 of the local machine to port 80 of the container. php-tools-demo is the image that runs in the container.
Open a browser tab and go to http://localhost<8000> to verify that the app works as expected.
The host port is configurable. Bind the container to a different host port if another application/service is using port 8000.
Test the containerized PHP application with PHPUnit
Assuming you’ve saved unit tests in the /var/www/html/tests/unit folder of the containerized PHP application, execute the following command in the terminal to run the tests.
docker run -it --rm php-tools-demo bash -c "phpunit tests/unit"Automate unit tests at build time
Although the above testing solution works, it doesn’t provide the best developer experience. To improve the testing workflow, you can either use a multi-stage build or build different images; one for testing and the other for running the server.
Replace the contents of the Dockerfile with the following code to leverage a multi-stage build that tests the application before starting it.
# Test, then build image

FROM php:apache AS tester

WORKDIR /var/www/html/

COPY --from=composer:lts /usr/bin/composer /usr/bin/composer

RUN apt update && \
   apt install --no-install-recommends -y \
   git p7zip-full unzip && \
   echo "ServerName localhost" >> /etc/apache2/apache2.conf

USER www-data:www-data

COPY --chown=www-data:www-data . .

ENV PATH="/var/www/html/php-tools/bin:$PATH"

RUN chown -hR www-data:www-data /var/www/html/ && \
   cd php-tools && \
   composer install --no-cache

RUN set -e && \
   phpunit --stderr tests/unit

FROM tester
Notice that the first FROM statement is now FROM php:apache AS tester. AS gives the FROM statement a name that can be referenced in other FROM statements. The last three lines of the Dockerfile have been updated to the following:
RUN set -e && \
   phpunit --stderr tests/unit

FROM tester
Now, add some failing tests to the tests/unit folder and rebuild the image to verify that it works. The build will fail if your project contains failing tests. Otherwise, it will complete without issue.
Running a new container (with docker run) on the same port (with the -p flag) as an active container will return an error. Stop the previous container with docker stop CONTAINER_ID before starting a new container on the same port or bind a different host port to the container’s port 80.
Ideally, you should chain set -e && phpunit --stderr tests/unit to the existing RUN command, but this guide uses a separate RUN command for clarity. tester in the last line is the name of the image that Docker built in the previous stage. It contains all files, configuration, and libraries the application needs to function.
Develop within the containerized PHP application
To develop within the containerized PHP application, do the following:
- Open the local project folder in VSCode and run the following command in the integrated terminal.
docker run -it --rm -p 8000:80 --mount type=bind,source="$(pwd)",target=/var/www/html php-tools-demo- Make changes to one of the application’s pages and open (or refresh) that page in the browser to verify the change.
Add new tools to php-tools
If a project requires packages that are not currently available in php-tools:
- See Adding new tools for how to add new packages to your application’s php-tools.
- Rebuild the image, stop the container, then run the image again.
Containerisation best practices
The following are some best practices for building containers:
- Minimize the use of
RUN,COPY, andADDcommands. They create intermediate containers which can result in larger images. - Clean up the system and package cache if you didn’t explicitly prevent cache cleanup while installing packages.
- Expose only the ports you need.
- Configure containers to run processes as a non-
rootuser. Only use the root account for operations such as system package installation which requires root access. - Place commands that are most likely to change at the bottom of the Dockerfile. It prevents cache bursting at build time.