Using project cards to assign and complete tasks
Overview
A card is a work item that a project team member (assignee) must complete. Any team member can create a card and assign it to the appropriate person. This guide walks you through the process of using project cards to assign and complete tasks in a project.
Add a card to a project
To add a card to your project, do the following:
- Go to https://hq.linkorb.com/projects and open the project.
- Click the
 button at the top right.
 - Fill the card’s details as follows:
- Title: A short descriptive title.
- Description: A detailed description of the work’s:
- requirements
- purpose
- deliverables
- Milestone: What part of a larger or longer running project the card belongs to.
- Component: The project component under which to classify the card.
- Swimlane: The (horizontal) group to which the work item belongs.
- Sprint: What scrum-like sprint the card falls under in a (large) project.
- Parent (Epic): A sub-card’s parent.
- Card type: ‘Task’ is the default card type. See Card type to decide what card type is appropriate for your work item.
- Flow: The card’s workflow. ‘Task’ is the default workflow but the Flow field may differ from project to project.
- Status: The card’s current state. See Card status for more information.
- Prio: Priority (prio) of the work item. See Set card priority for more information.
- Points: Your (the card owner’s) estimate (in minutes or hours) of how long the task should take.
- Points confidence: Your (the card owner’s) level of confidence that the assignee will complete the work in the time specified in the Points field.
- Due at: The card’s due date. See Set due dates for best practices on due dates.
- Tip: Click the
 icon to the right of the Due at field to select a date from a calendar instead of typing the date manually.
- Tip: Click the
- Assignee: The username of the team member you want to assign the card to.
- Owner: The creator/supervisor of the work item.
- Progress: How close the assignee is to completing the work.
- Click the
 button below the Description field.
Create a sub card
A sub card is a sub-task for a work item. Use sub cards to break multi-stage or complex work into chunks. To add a sub-card to an existing card:
- Open the card to which you want to add a sub-card.
- Click the
 button in the Sub cards section below the card’s description.
 - Write the sub card’s title.
- Select the project owner’s username in the Assignee field.
- Select the card’s priority in the Prio field.
- Set the status to new (see why this is important in Default new card status)
- Click
 .
. - Scroll to the newly created sub card in the Sub cards section of the parent card.
- Open the newly created card by clicking it.
- Click the
 button.
 - Fill out the sub card’s details and save it as described in Add a card to a project.
Add a sub card from the WBS1 view
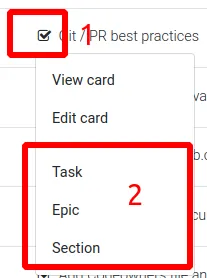
Although it’s possible to select what part of the WBS a (sub) card falls under from the Component and Parent (Epic) fields, the WBS1 view offers a simpler solution. To add a (sub) card to a branch of the WBS:
-
Open the WBS1 view of the project and locate the card.
-
Point your mouse cursor at the checkbox or folder icon to the left of the card’s name, and select Task, Epic, or Section (See Card type for more information).
-
Fill out the card’s details as described in Add a card to a project.
Change the parent of a sub card
Link an existing sub-card to a different card as follows:
- Locate and open the sub card you wish to link to another card.
- Click the button.
- In the Parent(Epic) field of the Edit Card page, select the card to which you want to link the sub-card.
- Click
 .
.
Create an urgent card
See the URGENT section of the home dashboard for what counts as an urgent card.
To create an urgent card, complete the steps described in Add a card to a project, but select 1 in the Prio field. See Set card priority for more information on each priority level.
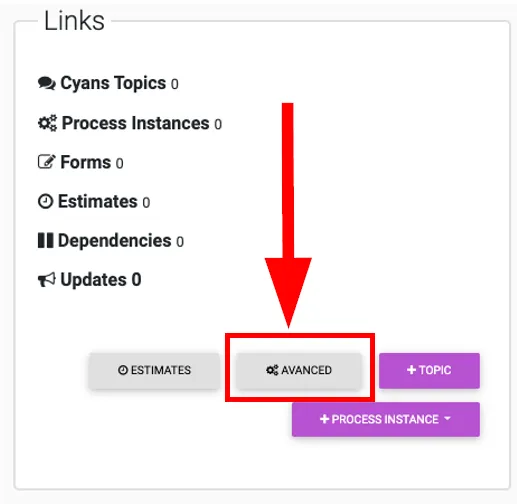
Create a recurring card
See the home dashboard for what counts as a recurring card.
You can create a recurring card as follows:
- Create a new card or open an existing card.
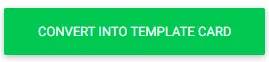
- Click the Advanced button in the card’s Links section.
- Click the
 button to make the card reusable.
- The Template Due date field in the template card takes a date that is relative to the creation date. For example, +3 days sets the due date to 3 days after the card is created. You can further customise the due date using a cron job as follows:
- 1. Go to https://hq.linkorb.com/cron/jobs to create a job (time-based automated job).
- 2. Click the Add button to create a cron job.
- The Template Due date field in the template card takes a date that is relative to the creation date. For example, +3 days sets the due date to 3 days after the card is created. You can further customise the due date using a cron job as follows:
Card properties (extended)
Card properties give team members more information about a work item in a project. While the Add a card to a project section describes card properties at a high level, this section offers more information on the following card properties:
- Type
- Status
- Prio
- Impact
Card type
The Type property helps organise work items in a project, especially in large projects. What card type you create depends on the complexity of the work item. A card can be one of the following:
- Task: Default card type used to assign tasks to team members.
- Epic: Breaks down a complex or multi-step project task into smaller, manageable (sub) tasks.
- Section: Large lists of tasks and Epics organised into a structure that gives the best overview of a project. Examples of such subdivisions are:
- milestone/phase A, B, C
- content, technology, analytics
- application frontend/backend
- program component (file, agenda, financial, etc.)
Card status
A card’s status indicates how much progress a card’s assignee has made. HQ provides two methods of setting a card’s status. They are:
- Default new card status
- Updating a card
Default new card status
When you create a new card, HQ automatically sets the card’s status to new. This status does two things:
- It assigns the card to the project owner until the project owner writes the card’s requirements, purpose, deliverables, and classifies the card.
- It allows project owners to quickly find new cards in the project by:
- adding the new card to the new cards list
- showing a notification bubble in the project’s Dashboard tab
Note: It’s okay to change the card’s status to something other than new if you’ve already filled out all the details.
Updating a card
Apart from setting a card’s status during its creation, team members can update a card’s status. You can add such updates from the Type field in the Add update section of a card.
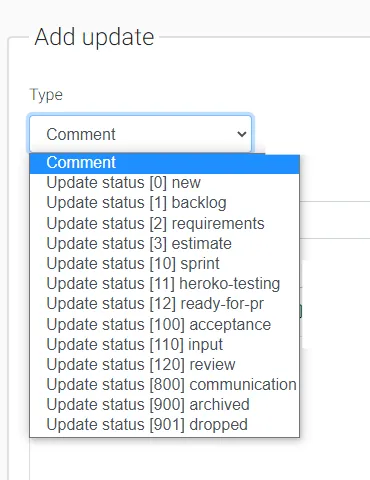
The following is a list of card status types and their descriptions:
- New: A new card assigned to the project owner. See Default new card status for more details.
- Backlog: The card owner has outlined the card’s requirements and purpose, but the assignee is yet to complete the assigned work.
- Estimate: The assignee has given the card owner a quote of how long (in hours) it would take to complete the task.
- Sprint: The card owner has highlighted a task the assignee must complete.
- Heroku testing: A frontend component is ready for testing in the plaza Heroku app.
- Ready for PR: The assignee has fulfilled all work requirements and is ready to open a pull request.
- Acceptance: The work has reached a phase where a supervisor must evaluate the results against requirements set in the backlog stage.
- Input: The card owner has provided more information, has a question, or has answered a question.
- Review: The assignee wants the card owner or Subject Matter Expert (SME) to review the completed work and provide feedback.
- Communication: The assignee needs internal or external communication to complete the task.
- Archived: The assignee has completed the task and is archiving it for future reference.
- Dropped: The card owner dropped (deleted) the card because it’s no longer required.
See Select the appropriate status update type for best practices when updating cards.
Set card due dates
Keep the following in mind when setting due dates:
- Only set a card’s due date if the task has a deadline.
- Add due dates when all team members have to perform a certain action in a process.
- Set due dates at least 1 week from the current date.
Set card priority
A priority level of 1 to 5 gives card assignees an idea of how urgently they should handle a card. The following is a description of each priority level.
-
1 (Urgent): Extreme necessity affecting multiple users, causing financial loss, or posing privacy issues. The task must be completed ASAP.
-
2 (Must haves): Necessary issues that affect users and cause financial loss or privacy problems. The task must be completed on the same day that it is assigned.
-
3 (Should haves): Moderate priority; bugs affecting users or development required for platform growth. Such tasks should be completed when the assignee has the time to work on them.
-
4 (Would haves): Below average priority. Bugs that do not immediately impact daily use. Cards assigned this priority are less critical for a project’s functionality. Such tasks are executed after completing the essential tasks needed to make the MVP successful. These tasks have business value and must be completed to finalise the project.
-
5 (Nice-to-haves): Features or bugs we’d like to address but are not strictly necessary. These usually enhance user experience or involve issues affecting a single person without immediate financial impact, added value, or privacy concerns. Tasks are handled if time allows; they’re enjoyable to complete but have no direct business value.
Card impact
The Impact field of a card is a hard requirement for our NEN7510 compliance. After due consideration, use the Impact field to indicate whether the work item in a card impacts the following:
- privacy
- security
- patient safety
Leave the Impact field blank if there is no impact. However, ensure that you select the Impact field in the checklist to explicitly show that you have considered it.
Card tags
At the moment, tags are virtually not used. Tags only become important when you want to give a card priority within a project. You can create a tag by selecting ZP-block or Onatal-block from the development block.
View a card’s details
You can open a card and view its details from any of the following HQ pages:
To view a card’s details from any of the above listed pages (except Kanban view):
-
Find the card.
-
Point your mouse at the checkbox or folder icon to the left of the card and select View card (quick) or View card (full).
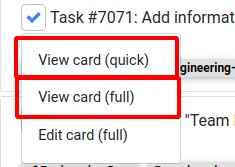
View card (quick) opens the card in a (minimised) modal on the current page. View card (full) opens the card in a different page.
Request reviews on completed work
If the completed work is managed through version control, see Creating and reviewing pull requests for pull request guidelines.
Using the maintenance block
Use the maintenance block for project cards such as:
- Bug reports/fixes
- Minor adjustments (names of fields, moving parts, etc.)
- Tasks blocking the progress of another project
Do not stash a card in HQ’s maintenance block. If it takes more than 8 hours to fix a bug in the maintenance block, create a card or sub-card for that bug and assign it to someone.
Card best practices
See HQ project card best practices for further guidelines on using cards.