Managing and proposing projects at LinkORB
Overview
HQ is a primary, web-based tool at LinkORB used for teamwide project and task tracking, status updates, internal wiki documentation, and much more. This document is focused on the project tracking tool and recommends best practices for project owners.
Project workflow
The following is a typical HQ project workflow:
- The project owner (PO) starts the project by identifying or determining the project’s:
- tasks
- team composition
- scope
- impact
- The PO briefs the team on the project, discussing the finer details to:
- ensure the requirements are clear
- discuss the key performance indicators (KPIs)
- estimate the project’s duration
- The PO assigns tasks to team members working on the project.
- In the weeks that follow, the PO updates Management on the project’s progress.
- If a project leads to a process, the team documents that process in the process library.
Managing projects
Manage your own projects (i.e. projects you’re the owner of) from the My Projects (Owned) dashboard. To view all projects you’re part of, point your mouse cursor on the Projects navigation item and select Project list & search.

Using project views
Saving a newly created project or opening an existing project from the projects page loads the project’s WBS1 view by default. Click any of the tabs next to the WBS1 view to access that view.

-
WBS1 view: A table-style Work Breakdown Structure of the project. Each row of the table is a project card (work item). Each top-level card has a gray background while its sub cards have a white background. This makes it easy for team members to quickly scan the WBS.
See Using project cards to assign and complete project tasks for more information on creating, viewing, and editing cards from the WBS1 view.
-
WBS2 view: This is similar to WBS1 view except it organises the project’s Work Breakdown Structure into a nested list of cards and sub cards.
-
Description: A summary of the project’s purpose and description.
-
Dashboard: Currently active project cards organised into different sections in a grid based on their status and due dates.
-
List view: Stacked lists of cards in a project grouped by state, assignee, priority (prio), milestone, sprint, or component.
-
Kanban view: A grid of cards grouped by state, assignee, prio, milestone, sprint, or component.
Updating a project’s flow state
A project’s flow state indicates where the project is in its lifecycle. Update a project’s flow state as follows:
- Visit the projects page.
- Click the name of the project whose flow state you want to update.
- Click the project’s current flow state next to Flow state:.

- Click the blue Admin button at the top right of the page.
- Click Flow to open the Flow: Project page.
- Click the blue Modify button to go to the Flow run page.
- Select the project’s current phase under Flow state.
- Click the blue Save button.
Project cards
A project card is a work item. It’s how we assign and track tasks for each project team member. See Using project cards to assign and complete project tasks and HQ project card best practices for more information.
Creating a new project
Create an HQ project as follows:
-
Click the green Add Project button.
-
Fill out the form fields in the Add project settings page as follows:
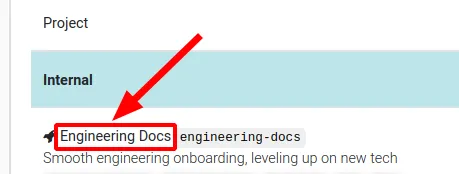
- Code: A short (2- or 3-word) name of the project. It should be only lowercase characters with hyphens (-) as spacers. For example engineering-docs.
- Name: A recognisable name that team members can easily remember.
- Purpose: One short sentence describing the project’s purpose.
- Status: Indicates whether a project is active for team member contributions. Set the project’s current state to one of the following:
- Active: The project is active for team member contributions.
- Hold: The team will resume the project in the future.
- Archive: The team completed the project or the owner rejected the project.
-
Select the group that the project falls under in the Group field. If you can classify the project under several groups, please consult with the product owner before you continue.
-
Select the LinkORB Userbase ID (UBID) of the person responsible for the project in the Owner field.
-
In the Time Frame field, set the time frame in which you expect the team to complete the project. The Chief Executive Officer (CEO) and the PO will review this time frame later and possibly adjust it.
-
Write a detailed description of the project in the Description field. In describing the project, clearly define its:
- goal(s)
- scope
- time frame
- success KPIs
If the project is a pitch, answer the following questions in the description:
- Why is this project a good idea?
- Should we do this project now?
If the project is in the Business case phase, add the link to the business case in the project’s description. If the project does not have a business case, create a Business case as follows:
- 1. Click the asterisk (*) icon at the bottom right of the screen of HQ.
- 2. Select Form: business-case
-
Click the green Save button.
Deciding project priorities
While a project is ongoing, the P.O. and team members have a bi-weekly discussion to decide whether the project’s priorities are still correct. During this discussion, they also:
- decide priorities per person
- check project phases
- decide whether to move to the next phase of a project
Project planning and review
In the last week of each quarter:
- We plan and discuss projects for the next quarter.
- A supervisor reviews current projects against defined KPIs to decide if the team has achieved its goal.
Using a work breakdown structure (WBS)
A work breakdown structure (WBS) is a hierarchy, which outlines the concrete partial results/products of a project. It organises a project into smaller, discrete, more manageable components (phases, tasks, sub-tasks). A WBS gives insight into project details like:
- Duration
- Cost
- Tasks
- Responsibilities
See the WBS1 view and WBS2 view sections of Using project views for more information.
Example: House project WBS
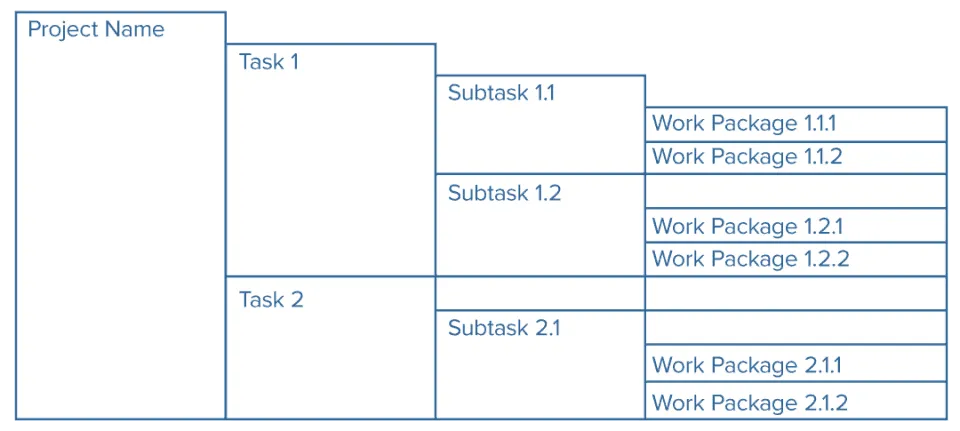
To give an example of a WBS, imagine you and your team need to build a house. To complete this project successfully, you create a WBS as follows:
- You define the scope and KPIs of the project. The house should have the following:
- a roof
- 1 kitchen worktop
- 1 kitchen drawer
- 1 counter top
- 1 extractor hood.
- Then you create a project, name it House, and specify the tasks and subtasks as follows:
- Project name: House
- Task 1: Kitchen
- Sub-task: Kitchen worktop
- Work package: Measure kitchen worktop
- Grab tape measure
- Work package: Choose kitchen worktop
- Work package: Pick up kitchen worktop
- Work package: Install kitchen worktop
- Work package: Measure kitchen worktop
- Sub-task: Counter top
- Sub-task: Extractor hood
- Sub-task: Kitchen appliance
- Sub-task: Hob
- Sub-task: Kitchen worktop
- Task 2: Roof
- Task 1: Kitchen
- Project name: House
The image below illustrates the structure (WBS) of our example project so far.
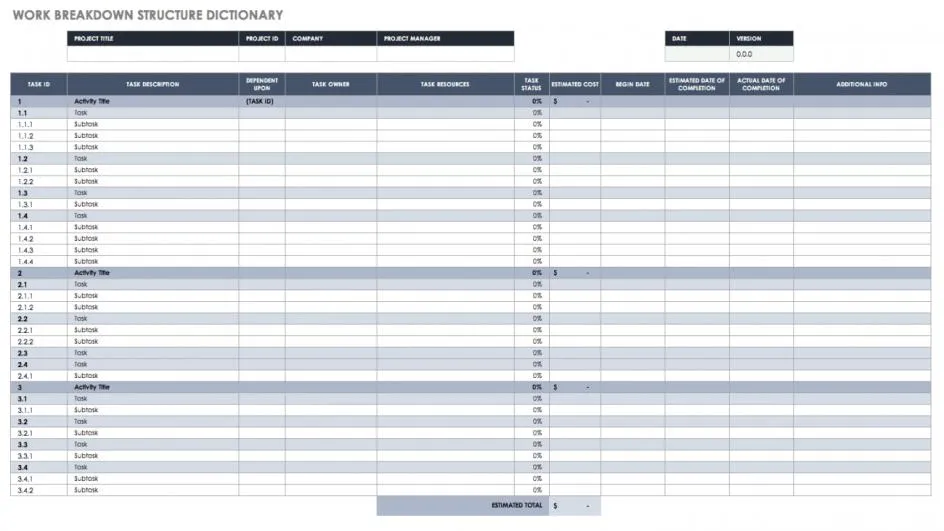
Based on the current WBS, you can create a WBS dictionary that will look like the following:
Although often skipped in the planning process, a work breakdown structure or dictionary is a powerful tool to complete projects efficiently and on time.
Benefits of creating a WBS
Creating a project WBS benefits your team because it:
- provides a visual representation of all parts of a project
- gives Management and the project team insight into the progress of an ongoing project
- defines specific and measurable results
- breaks the work into manageable tasks
- provides a way to make successful experiences repeatable
- lays a foundation for estimating costs and allocating resources
- ensures no overlap and no gaps in responsibility or resources
- reduces chances of adding items outside the project’s scope
- reduces chances of overlooking a crucial result/goal
Creating a WBS: A high-level guide
Before you delve into the fine details of a project’s WBS, it’s important to hone it at a high level. First, take these important preparatory steps:
- View the business case
- Review the deliverables and scope
- Divide the deliverables into manageable tasks (Epics)
- Subdivide the deliverables into subtasks
Creating a project team
- Click the Team tab to open the Project team member page.
- Select the person(s) you want to add to your team from the Add member section.
- Click the Save button.
- Verify that you added the correct team members by reviewing the team members list at the bottom of the page.
To remove people from the team:
- Click the line to the right of the person you wish to remove.
- Select Remove.
Submitting a pitch
Any team member can propose a project at any time by creating a project and setting the project’s flow state to Pitch.
Using a Repository
You can enable a repository on a project-by-project basis. This process makes the most sense in larger/maintenance projects. To use a repository, do the following:
- Open the project settings
- Add
default-closed-card status: hiddento the *Config (YAML) block at the end.
We only use the configuration block (YAML) for advanced or experimental functions to see if they work as expected. Once they work as expected, we create user interface options for those settings.